Tiny house living, with its limited space and trailer-based designs, has exploded in popularity, offering a minimalist lifestyle and freedom from the traditional housing market as a great option. However, one of the critical challenges tiny homeowners face is setting up efficient plumbing systems, including water lines and drain lines for a bathroom sink, within limited spaces. From ensuring proper water flow to dealing with waste management, tiny house plumbing requires innovative solutions for drain lines, toilet, and showers that differ significantly from standard residential setups due to limited space. In this post, we’ll dive into how you can tackle these challenges head-on, ensuring your tiny house is as comfortable and functional as any other dwelling, despite the limited space and the need to finish plumbing along the way.
Understanding Tiny House Plumbing Fundamentals
Key Components
Tiny house plumbing revolves around a few crucial components. Pipes, fittings, water heaters, rough plumbing, finish plumbing, and drain lines make up the backbone of any plumbing system.
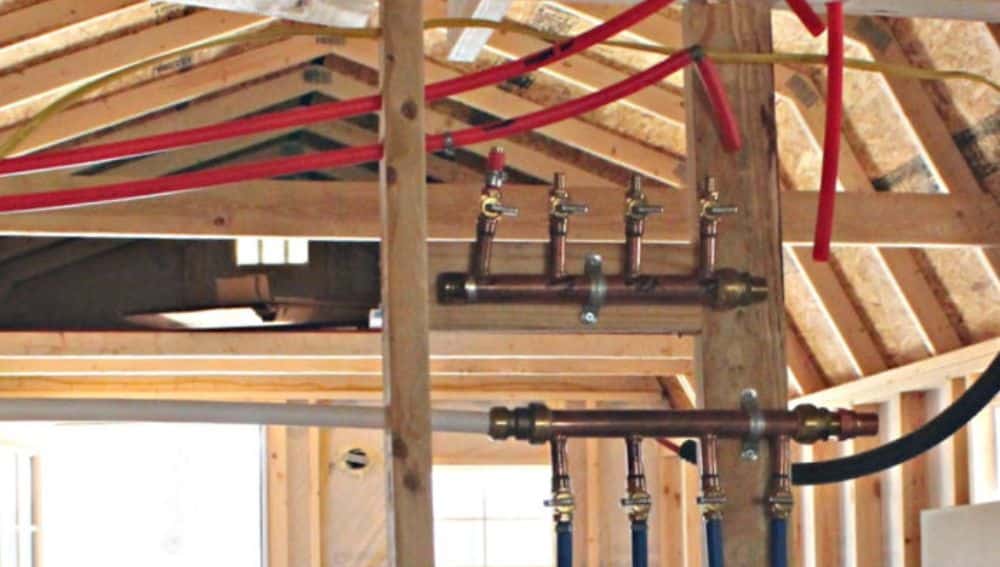
Pipes transport water in and out of your home. They must be durable yet flexible enough to fit into small spaces, as PVC grid systems need. Fittings connect these PEX and PVC pipes together in water lines and drain systems, ensuring a leak-free system. The water heater, connected via pex, is essential for providing hot water throughout your tiny house, requiring minimal space and featuring a drain hole.
Choosing high-quality materials for these components ensures longevity. Copper, PEX, or PVC piping is popular for water line and hot water heater installations due to their reliability and ease of installation.
Material Choices
Choosing the right materials, like PEX for hot water and drain systems, can make or break your tiny house plumbing and waste water system.
For pipes and fittings in systems like hot water heater, drain, and vent, options like PEX are favored for their flexibility and durability in tight spaces. It’s also resistant to freezing temperatures which is vital for a house’s pex hot water heater in colder climates.
Selecting an efficient water heater is equally important. Tankless models are preferred for saving space in a house without compromising on hot water supply, requiring a vent, drain, and pex connections.
Water Systems Overview
Understanding the flow of water into and out of your tiny house, including the drain, pex, vent, and space considerations, clarifies much about its plumbing needs.
The water supply system brings fresh water in. This can be from a municipal source or collected rainwater treated for use.
For waste removal, the waste system efficiently transports used water away from the house to a sewer or septic tank through drains, incorporating PEX pipes and vents.
Both house systems require careful planning of lines and vent to ensure efficiency and meet legal requirements with PEX.
-
Proper insulation
-
Regular maintenance checks
-
Use environmentally friendly products whenever possible
Planning Your Tiny House Plumbing System Effectively
Layout Mapping
Before you start building your house, mapping out your plumbing layout including drain, pex, and vent is crucial. This step ensures that everything, including pex, vent, and drain lines, fits perfectly in the limited space of a tiny house. Consider where the bathroom sink, shower drain, kitchen sink, and vent for the house will be located, ensuring PEX is used for hot water connections. Use PVC pipes or PEX tubing for efficient water flow in house drain lines.
Creating a detailed plan avoids future issues with installation. It helps identify the best spots for your water heater, cold water line, PEX lines, and drain in your house. Remember to include space for venting systems too.
Utility Access
Decide early if you’ll connect your house to public utilities or opt for off-grid solutions, including drain and PEX lines. Public connections, like a PEX line, provide reliable access to water but may limit where you can park your tiny house. Off-grid options like rainwater collection systems require more planning but offer freedom of house location and pex line installation.
For off-grid living, consider installing a compact water heater designed for small spaces in your house, with a PEX line. Ensure every pex connection in the hot water line has a tight seal to prevent leaks in the house.
System Integration
Integrating plumbing with pex line and other systems in your tiny house is essential for efficiency and comfort. The electrical system in a house must safely power the hot water heaters without overloading circuits.
Incorporate HVAC elements in the house so that vents do not interfere with plumbing lines or cause condensation issues around PEX pipes and tubing.
-
Pros of effective integration:
-
Better use of space
-
Reduced energy consumption
-
Increased comfort levels
-
-
Cons:
-
Requires careful planning
-
May need professional help
-
Step-by-Step DIY Guide for Tiny House Plumbing Installation
Tools Checklist
Before diving into the house’s pex installation process, ensure you have all necessary tools and materials. This step is crucial to avoid any hiccups during your house project with pex.
-
Adjustable wrench
-
Pipe cutter
-
Hole saw (for cutting through walls or floors)
-
Measuring tape
-
Soldering iron (if working with copper pipes)
Having these tools at hand will make the installation smoother. Also, remember safety gear like gloves and goggles.
Cutting Pipes
Cutting and fitting pipes accurately is essential in tiny house plumbing. Measure twice, cut once. This old adage has never been truer than when working on your tiny house’s plumbing system.
Use a pipe cutter for precise cuts. For larger holes, such as those needed for a tiny house toilet, use a hole saw attached to your drill. Ensure each piece fits snugly before moving on to soldering or securing connections.
Leak Testing
After installing pipes and fixtures, testing for leaks is critical before finalizing everything. Fill your system with water and check each connection carefully.
Look for drips or moisture around joints. If you find any leaks, tighten connections or reapply joint compound where necessary. This step ensures that your plumbing system is secure and won’t cause issues down the line.
Water Supply, Drainage, and Waste Disposal Essentials
Fresh Water Supply
Options for sourcing fresh water in a tiny house vary. You can choose between a water hookup or using water tanks.
Hooking up to a city water supply offers convenience. You get continuous access to drinking water. It requires connecting your home’s water line to the main supply.
Water tanks provide independence from municipal systems. They need regular filling but allow off-grid living. Tanks store rainwater or hauled water for use.
Waste Management
Efficiently managing waste water is crucial. This includes both greywater and blackwater.
Greywater comes from sinks and showers. It can be reused for gardening after proper filtering. Blackwater, from toilets, needs careful disposal due to health risks. Systems like septic tanks or composting toilets are popular choices among tiny house owners.
Legal Considerations
Understanding legal requirements is vital before setting up your system.
Different areas have specific rules on waste disposal methods. It’s important to check local regulations regarding drainage and waste management. This ensures your setup complies with environmental standards.
Climate Challenges and Insulation for Tiny House Plumbing
Freezing Protection
Tiny house plumbing faces unique challenges, especially in cold climates. Protecting pipes from freezing is crucial to avoid costly damage. Two popular methods are heat tape and pipe insulation.
Using heat tape involves wrapping electrically heated cables around pipes. This keeps them warm during harsh winters. However, it requires electricity which might not be ideal for off-grid living.
Pipe insulation, on the other hand, acts like a cozy blanket for your pipes. It’s simple to install and doesn’t need power to work. Foam or fiberglass materials are commonly used.
Ventilation Solutions
Proper ventilation is key in preventing condensation and mold in tiny houses. Without it, moisture can build up leading to serious health issues.
Installing vents near high-moisture areas helps keep air moving. Think kitchens and bathrooms primarily.
Another tactic is using dehumidifiers in spaces prone to dampness. They help maintain a healthy indoor atmosphere by removing excess moisture from the air.
Regular Maintenance Tips for Tiny House Plumbing
Routine Checks
Regular inspections are crucial. Look for leaks or damage often. This can prevent big problems later.
Leaks in a tiny house can cause more trouble than in bigger homes. They’re harder to find and fix due to the compact spaces. Check under sinks, around toilets, and where pipes connect.
Drain Care
Keep drains clean and clear. Clogged drains are a common issue but easy to avoid with regular care.
Use natural cleaners like baking soda and vinegar once a month. These keep your drains flowing smoothly without harsh chemicals. Avoid dumping grease or large food particles down the sink to prevent blockages.
Winterizing Plumbing
Protecting your plumbing from freezing is essential, especially after discussing climate challenges in the previous section.
Here’s how:
-
Insulate pipes.
-
Use heat tape on vulnerable pipes.
-
Keep a small drip of water running when it’s extremely cold outside.
These steps help maintain consistent pipe temperatures, reducing the risk of freezing and bursting.
Maintaining your tiny house plumbing system doesn’t have to be daunting if you stick to these tips:
-
Conduct routine checks for signs of leaks or damage.
-
Clean and unclog drains regularly using gentle methods.
-
Take proactive measures to winterize your plumbing before cold weather hits.
Estimating Costs and Budgeting for Tiny House Plumbing
DIY vs. Professional
When planning your tiny house plumbing, the cost is a big factor. Doing it yourself can be cheaper but risky if you’re not experienced. Hiring professionals ensures quality but increases the budget.
For DIY projects, expect to spend between $500 to $1,500 on materials alone. This range includes basic piping and fixtures. If you go professional, costs jump to around $3,000 to $7,000. This covers labor and higher-grade materials.
Saving Tips
To cut down on expenses without compromising quality, consider two main strategies: using reclaimed materials and opting for compact fixtures.
Reclaimed materials like pipes and fittings can save you a lot of money. Just make sure they’re in good condition. Compact fixtures are designed for small spaces which means they often cost less than standard sizes.
-
Reclaimed Materials: Save by finding used or surplus plumbing supplies.
-
Compact Fixtures: Choose smaller sinks or toilets that fit tiny house dimensions better.
Unexpected Expenses
Always prepare for surprises when budgeting your tiny house plumbing project. It’s not just about pipes and faucets; there are other costs too.
Unexpected expenses might include permits or correcting mistakes if you’re doing it yourself. Also consider the cost of tools if you don’t already own them.
-
Permits could add hundreds depending on local regulations.
-
Mistakes may require buying more materials or even hiring someone to fix them.
Differences and Benefits of Tiny House Plumbing Systems
Complexity Comparison
Tiny house plumbing is simpler than traditional systems. Most tiny homes have fewer fixtures, reducing complexity. Traditional houses often feature multiple bathrooms, a kitchen, and possibly outdoor connections which complicate the plumbing system.
In a tiny home, you might only need to connect a kitchen sink, shower, and toilet. This simplicity can lead to easier maintenance and troubleshooting. Plus, it’s more affordable due to fewer materials and less labor.
Water Usage
One significant benefit of tiny house plumbing is lower water usage. Smaller spaces mean smaller appliances and fixtures. For example, compact showers and toilets designed for tiny homes use less water per use.
This not only helps the environment but also reduces utility bills significantly over time. It’s especially beneficial if your tiny home uses collected rainwater or has limited access to municipal water sources.
Mobility Options
Many tiny houses are built on trailers offering potential mobility. This requires the plumbing system to be adaptable for travel.
-
Quick disconnect features
-
Flexible piping options
These elements ensure that moving your home doesn’t lead to leaks or damage within your plumbing system.
Customization Choices
Tiny living spaces offer unique customization options for plumbing.
-
Composting toilets as an eco-friendly option
-
Compact multi-use fixtures like combined shower-sink units
Such customizations maximize space efficiency while ensuring full functionality in your living area.
Final Remarks
Diving into tiny house plumbing might seem like navigating a mini maze, but you’ve got the blueprint now. From getting the basics under your belt to tackling installation and braving climate challenges, we’ve covered the ground together. Remember, your tiny home’s plumbing system isn’t just about pipes and taps; it’s the lifeblood that makes living small feel big. Whether you’re DIY-ing or budgeting, the key is to keep things simple and efficient. Tiny house plumbing systems offer a unique blend of simplicity and innovation, proving that good things really do come in small packages.
So, what’s next? Roll up your sleeves and make your tiny house dream a reality. Don’t let the fear of leaks dampen your spirits. With regular maintenance and a keen eye on costs, you’re ready to turn those tiny taps into mighty monuments of self-sufficiency and sustainability. Dive in, the water’s fine!