Table of Contents
- Step 1 – Choosing a Tiny Home Design
- Deciding on the Type of Tiny Home
- Selecting a Design Style
- Customizing Your Tiny Home
Tiny homes are becoming increasingly popular as a way to reduce the cost of housing and live more sustainably. If you’ve decided to build your own tiny home, there are several steps you need to take. This guide will help you understand what it takes to build a tiny home from start to finish.
The process begins with choosing a tiny home design that meets your needs and fits your lifestyle. Once you’ve chosen a design, it’s time to build the trailer that will serve as the foundation for your tiny home. After that, you can begin framing the walls and roof of your tiny home. The next step is creating an exterior envelope for your tiny home using siding, windows, and other materials. Finally, you can get creative with storage solutions that make the most of limited space in your tiny home.
By following this guide and taking each step one at a time, you can turn your dream of owning a tiny home into reality. Let’s get started!
Step 1 – Choosing a Tiny Home Design
When it comes to building a tiny home, the possibilities are endless. The first step is deciding which type of tiny home you want to build and selecting the right design style for your needs. From there, you can customize your tiny home to make it unique and perfect for your lifestyle.
Deciding on the Type of Tiny Home
The first thing to consider when choosing a tiny home design is what type of tiny home you want to build. There are several different types of tiny homes, including traditional stick-built homes, mobile homes, RVs, and park models. Stick-built homes are typically built on site and provide more space than other types of tiny homes. Mobile homes are smaller than stick-built homes but can be moved from place to place. RVs are the smallest type of tiny home, but they offer many amenities such as bathrooms and kitchens that other types do not. Park models are larger than RVs but still relatively small in size and often come with amenities like decks or porches.
Selecting a Design Style
Once you’ve decided on the type of tiny home you want to build, you’ll need to select a design style that fits your needs and tastes. There are many different design styles available for tiny homes, including modern, rustic, contemporary, traditional, industrial, cottage-style, and more. Each style has its own unique look and feel so it’s important to choose one that matches your personality and lifestyle.
Customizing Your Tiny Home
The next step is customizing your tiny home to make it truly unique. This includes adding personal touches like furniture selection, paint colors, flooring choices, window treatments, lighting fixtures, appliances, plumbing fixtures, countertops and backsplashes. You can also add practical features such as solar panels or water filtration systems if desired. By customizing your tiny home you can create a space that reflects your individual style while still being functional and comfortable for living in a small space.
Choose type & design style of tiny home, customize to make it unique & perfect for lifestyle.
Step 2 – Building the Trailer
Building the trailer is an important step towards creating your tiny home. There are several key components to consider when constructing a trailer, such as size and number of axles, attaching the hitch, and adding sides to the trailer.
Size and Number of Axles
The size of your trailer will depend on the size of your tiny home. A larger home will require a larger trailer, which will also need more axles in order to support the weight. It is important to consider these factors carefully when selecting a trailer for your tiny home. The number of axles you choose will also affect the maneuverability of your tiny home, so be sure to take into account how often you plan on moving it.
Attaching the Hitch
Once you have chosen a suitable trailer, you will need to attach a hitch that connects it to your vehicle. This is usually done using bolts or nuts and washers, depending on the type of hitch you choose. It is important to make sure that the hitch is securely attached before moving forward with any other steps.
Adding Sides to the Trailer
After attaching the hitch, you will need to add sides to your trailer in order to create walls for your tiny home. This can be done by using wood or metal panels that are cut and fitted together in order to create a frame for your walls. You may also choose to add insulation between these panels in order to keep your tiny home warm during colder months. Once this frame is complete, you can then move onto framing and exterior envelope construction.
|
Component
|
Description
|
|
Size & Number of Axles
|
The size and number of axles you choose will affect the maneuverability of your tiny home.
|
|
Attaching the Hitch
|
This is usually done using bolts or nuts and washers, depending on the type of hitch you choose.
|
|
Adding Sides to the Trailer
|
This can be done by using wood or metal panels that are cut and fitted together in order to create a frame for your walls. You may also choose to add insulation between these panels.
|
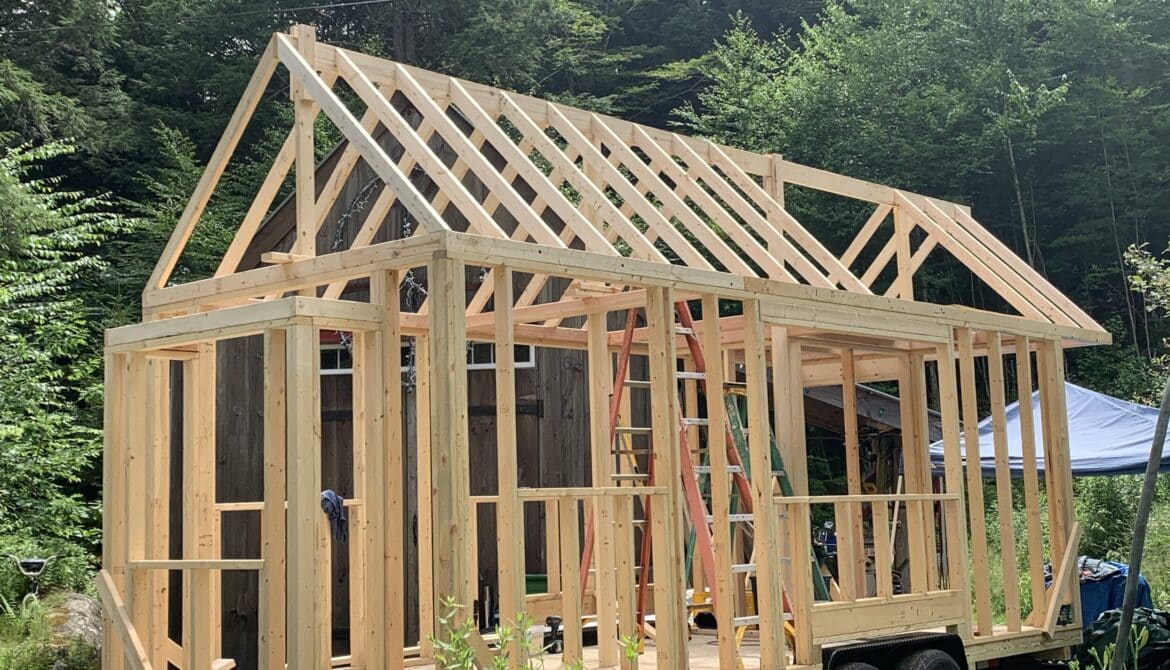
Step 3 – Framing
Once the trailer has been built, it’s time to begin framing the tiny home. This is an important step in the process as it will determine the shape of your tiny home and ensure that it is structurally sound.
Walls and Roof
The first step in framing is to construct the walls and roof of your tiny home. Depending on the design you chose, this could involve constructing a traditional stud wall frame or using a combination of steel and wood frames. Regardless of which method you use, make sure to use quality materials that are rated for structural strength and weather resistance. Additionally, be sure to consult with a professional if you are unsure about any steps in this process.
Sheathing and Window Installation
Once the wall frames have been constructed, they should be sheathed with plywood or OSB boards. These boards will provide additional protection from the elements while also providing a surface for window installation. When installing windows, make sure to use weatherstripping around each window opening to help keep out drafts and moisture. Additionally, be sure to caulk around each window frame before installing trim pieces for added insulation value.
By following these steps carefully, you can ensure that your tiny home will be safe and secure for years to come!
Construct walls and roof, sheath with plywood/OSB boards, install windows with weatherstripping and caulk for insulation.
Step 4 – Exterior Envelope
Once the framing is complete, it’s time to start working on the exterior envelope. This includes selecting siding, caulking, painting, adding window trim and installing kitchen cabinets.
Siding Selection
The type of siding you choose for your tiny home will depend on the look you’re going for and your budget. Common types of siding include vinyl, wood, metal, and fiber cement. Each type has its own advantages and disadvantages. Vinyl is one of the most affordable options but can be prone to warping in extreme temperatures. Wood is a more expensive option but has a classic look that many people prefer. Metal siding is durable and low maintenance but requires more insulation than other types of siding. Fiber cement is a good choice if you want a material that won’t rot or warp over time.
Window Trim, Caulking, and Painting
Once you’ve chosen your siding, you’ll need to install window trim around all of your windows and doors. This will help protect against water damage and give your tiny home a finished look. You’ll also need to caulk around all windows and doors to keep out drafts and moisture. Finally, you’ll need to paint the exterior of your tiny home in order to protect it from the elements.

Kitchen Cabinets, Countertops, and Backsplash
The last step in completing the exterior envelope is to install kitchen cabinets, countertops, and backsplash. If you’re building your own kitchen cabinets, make sure they are sturdy enough to withstand regular use. When choosing countertops for your tiny home kitchen, consider materials like granite or quartz that are easy to clean and maintain. Finally, add a backsplash behind the sink or stove area for an extra touch of style.
Creative Storage Solutions
When it comes to storage, tiny homes require creative solutions. One of the best ways to maximize storage space in a tiny home is by utilizing vertical space. Adding shelves and cabinets that reach all the way up to the ceiling can provide plenty of storage options. Additionally, utilizing under-bed storage is a great way to make use of otherwise wasted space.
Another creative solution for tiny home storage is using furniture with built-in storage. Coffee tables, ottomans, and even beds can be designed with compartments that are perfect for storing items like blankets, books, and other small items. Utilizing multi-functional furniture pieces like this will not only help you save on space but also on cost.
Finally, making use of wall space is another great way to store items in a tiny home. Installing peg boards or magnetic strips are both great ways to keep your kitchen utensils organized and off the countertops. Shelving units that hang from the walls are also a great way to store items without taking up too much floor space.
Overall, when it comes to creating storage solutions in a tiny home there are plenty of creative options available. Making use of vertical space, multi-functional furniture pieces, and wall shelving units are all great ways to maximize your storage options without taking up valuable floor space.