Living in a tiny home, unlike traditional homes, is all about maximizing space and efficiency, but the challenge can feel like fitting a square peg in a tight seal round hole, requiring work to make spaces functional. Unlike traditional homes with ample room for large water tanks, tiny homes require innovative solutions to meet daily water needs without sacrificing precious living space, incorporating plumbing costs, tight seal technology, and efficient drain lines into smaller spaces. From selecting the right size tank to optimizing its location and integrating sustainable living practices into your utilities, these tips will guide you through making the most of your tiny home’s water system—including proper drain lines—proving that small spaces don’t have to mean big compromises on comfort or functionality compared to traditional homes.
Understanding Tiny House Plumbing Mechanics
Basic Systems
Plumbing in a tiny home, including water lines and drain lines, operates much like in any house, just on a smaller scale, with considerations for water usage and water supply. Pipes carry water in and out. You have both fresh water coming into the tiny house and wastewater leaving it through drain lines.
Tiny homes often use flexible PVC piping for easier installation and movement of water lines, drain lines, and the cold water line. This flexibility is crucial because space is limited. The system might include pipes made from materials such as PEX or PVC for water lines, including the cold water line, which are lightweight and easy to work with, connecting to the water supply from the water source.
Key Components
The heart of your plumbing work includes PVC pipes, fittings, water lines, and various fixtures like sinks, toilets, and showers for both water and waste water.
-
Pipes: These are the channels for water flow.
-
Fittings: Connectors that join pipes together.
-
Fixtures: The visible parts of your plumbing system.
Choosing the right PVC size for each component ensures efficient water flow without wasting precious space, crucial for tiny house dwellers where solar work is involved.
Maintenance Access
Planning ahead can save you headaches later on. It’s vital to ensure easy access to your plumbing for maintenance, work, or emergencies, focusing on the water line and waste water location.
Create tiny access panels or choose fixtures that allow easy reach to shut-off valves for water work in any location. Remember, tight spaces and tiny work locations near water make repairs more challenging but not impossible with proper planning.
By considering these aspects during design:
-
You reduce future problems.
-
Ensure a functional living space despite its small size.
Selecting the Right Water Tank for Your Tiny Home
Size Matters
Choosing the right size for your water tank is crucial for work and location. In a tiny home, space is limited. You need a tank that fits well and meets your water needs.
Tiny homes require efficient use of every inch. A too-large tank wastes precious space. But, a too-small one means running out of water often. Consider how much water you use daily. This includes drinking, cooking, and bathing.
Material Choices
The material of your water tank affects durability and safety.
Plastic tanks are lightweight and affordable. They’re great for tight spaces in tiny homes. However, tiny water posts may not last as long as other materials.
Metal tanks are stronger but heavier. They can handle more pressure but might need insulation against cold weather to prevent water from freezing.
Portable vs Fixed
There are pros and cons to both portable tiny water tanks and fixed water tanks with posts.
-
Portable Tanks:
-
Easy to refill.
-
Can be moved if needed.
-
Might not provide a tight seal against leaks.
-
-
Fixed Tanks:
-
Secure; no worries about shifting during travel.
-
Better integration with tiny home plumbing systems.
-
Installation can be complex and costly.
-
Calculating your daily water usage helps determine the right capacity for your tank:
-
Track how much water you use in a day.
-
Multiply by the number of days between refills or access to tiny water fill-up stations.
-
Add extra capacity for guests or unexpected needs.
DIY Tiny House Plumbing Guide
Installation Steps
Installing plumbing in a tiny home requires careful planning. Start by sketching a detailed diagram of your tiny water system. This includes the water tank, pipes, and drain lines.
First, mount your water tank securely. Ensure it’s accessible for maintenance. Next, connect the main water line to both your inlet and outlet points on the tank. Use quality pipes to prevent leaks.
Required Tools
For this job, you’ll need specific tools and materials:
-
Pipe cutters
-
Wrenches
-
Teflon tape
-
PVC or PEX piping
-
Fittings and valves
Gather these tools before starting. It saves time and prevents interruptions during installation.
Common Mistakes
Tiny house dwellers often make avoidable mistakes in DIY plumbing water systems.
-
Ignoring local building codes.
-
Using mismatched pipe sizes.
-
Forgetting to insulate pipes against freezing temperatures.
Always check local regulations before starting work on your tiny water plumbing system.
Avoid using different size pipes for connections; it can lead to leaks or reduced water flow efficiency, especially with tiny discrepancies.
Lastly, insulating your tiny water pipes is crucial in cold climates to prevent freezing damage.
Water Hookup Options for Tiny Houses
Direct Line vs. Tank
Choosing between direct water lines and water tank hookups is crucial for tiny house living. Each option has its pros and cons.
Direct water lines offer constant water supply. They’re reliable but require a stable, permanent location. You need access to municipal services or a well.
Water tanks provide flexibility. They allow you to live off-grid but require regular refilling with water, even in tiny setups. This can be challenging in remote areas or during dry seasons when water is tiny.
Securing Water Source
Finding a steady water source is essential for your tiny home’s survival.
For direct line connections, contact local utilities early on. Ensure your site allows such installations.
For tanks, consider multiple refill options:
-
Rainwater collection systems
-
Nearby lakes or rivers
-
Local filling stations
Research and plan according to your location’s resources.
Seasonal Adaptations
Adapting to seasonal changes ensures you never run out of water.
In summer, use tiny shading over your water tank to reduce evaporation. Winter requires insulation around tiny water pipes and tanks to prevent freezing. Always have an emergency supply of tiny water containers in case of sudden shortages or extreme weather conditions.
On-Grid vs Off-Grid Water Supply Options
On-Grid Benefits
Being on-grid means your tiny home is connected to a municipal water supply. This setup offers reliability and convenience. You get water whenever you need it, without worrying about tiny shortages or quality issues.
However, this option can be costly over time. Monthly bills add up, especially in tiny areas where water costs are high.
On-Grid Drawbacks
One major drawback of being on-grid is the lack of independence. You rely entirely on the municipal system. If there’s a tiny problem or water outage in your area, you’re affected too.
Moreover, some tiny locations may not offer easy access to an on-grid water source. This makes it challenging for tiny homes situated far from urban centers to access water.
Off-Grid Solutions
Exploring off-grid solutions like tiny rainwater collection systems and wells gives you more control over your water supply. Rainwater can be collected using gutters and stored in tanks for later use.
Wells provide a steady underground water source but require initial investment for drilling and maintenance.
Both water options promote sustainability by reducing demand on municipal systems and harnessing natural resources directly at your location.
Hybrid Systems
Hybrid systems combine the best of both worlds: they offer flexibility and reliability by utilizing both grid-tied services and off-grid methods like solar power for energy needs.
A hybrid approach allows you to switch between sources based on availability or cost-effectiveness at any given time.
Integrating a Water Heater and Building a Functional Bathroom
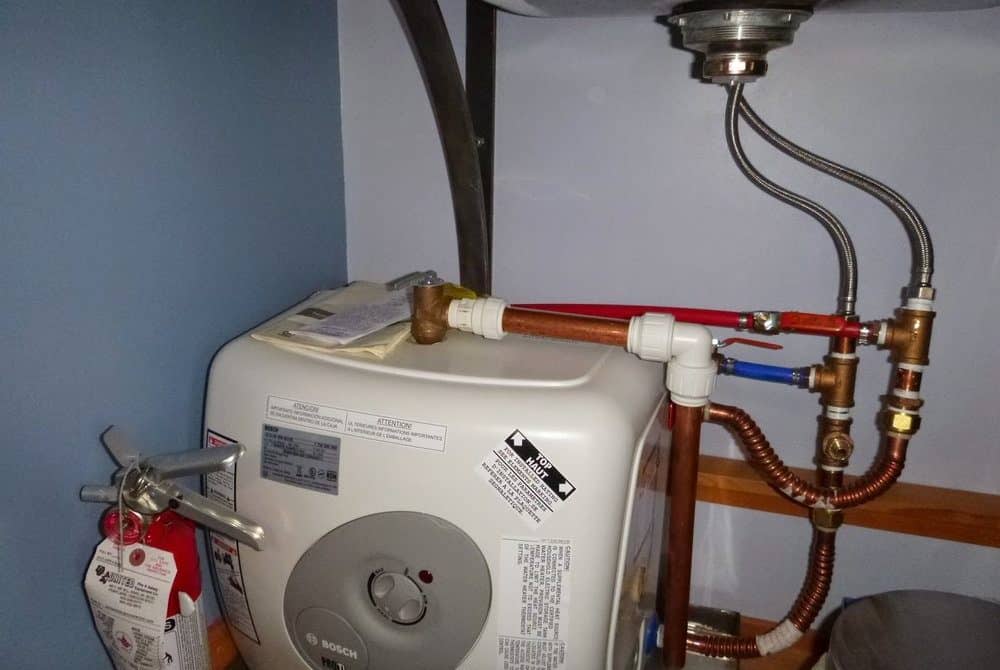
Water Heaters
Choosing the right water heater is crucial for tiny homes. You have two main options: tankless or traditional.
Tankless heaters save space and provide hot water on demand. This means you don’t wait for water to heat up, saving time and energy. However, they might require more upfront investment.
Traditional water heaters, on the other hand, are less expensive initially but take up more room. They keep a tank of hot water ready, which can be handy but also means higher energy usage over time.
Space-Saving Designs
When planning your tiny home bathroom, think simple yet functional with water usage in mind.
For showers, consider corner designs that maximize space. Use compact water sinks that fit snugly against walls or in corners too. The idea is to leave enough room to move around comfortably without sacrificing needs like a flush toilet, access to hand washing, or water.
Ventilation, moisture, and water control are vital in small spaces to prevent mold growth and ensure air quality remains high. Install efficient fans near shower areas and make sure windows can open to let fresh air circulate.
Eco-Friendly Water Tanks and Greywater Methods
Sustainable Materials
Choosing the right materials for your water tank is crucial. Sustainable living starts with using resources wisely. PVC water tanks are popular but consider eco-friendlier options too.
Steel tanks, especially those made of stainless steel or coated to prevent rust, can be a great choice for water storage. They’re durable and recyclable. Another option is polyethylene tanks made from food-grade plastic for water storage. They’re lightweight and less impactful on the environment.
Greywater System
Setting up a greywater system takes your sustainable efforts further. This system recycles waste water from sinks, showers, and washing machines. Use it for gardening or flushing toilets.
Here’s how to start:
-
Separate greywater from blackwater (from toilets). It’s important.
-
Filter the greywater to remove solids.
-
Direct it to your garden or toilet tank.
Remember, not all plants like soap! Choose soaps that won’t harm your garden.
Legal Considerations
Before going all in, know what’s legal in your area regarding greywater use.
Some places have strict rules about how you can reuse water due to health concerns. You might need permits or special systems that ensure water safety.
Research local laws first:
-
Check if you need any permits.
-
See if there are restrictions on soap types or water filtration methods.
-
Understand fines for non-compliance.
Legal Codes and Installation Cost Considerations
Zoning Laws
Navigating zoning laws is crucial. Different areas have specific rules about water plumbing in tiny homes. Research is key to avoid legal issues.
You must also consider building codes related to plumbing. They ensure safety but can be complex. It’s essential to understand them before starting your project.
Budgeting Tips
Budgeting for your tiny home’s water plumbing system involves several factors. Labor costs and fixtures are significant expenses.
-
Labor costs can vary widely.
-
Fixtures include sinks, toilets, and showers.
DIY installation can save money but requires skill. Weigh the pros and cons carefully:
-
Pros of DIY:
-
Saves on labor costs.
-
Offers a learning experience.
-
-
Cons of DIY:
-
Time-consuming.
-
Potential for mistakes without proper knowledge.
-
Professional installation ensures quality but increases the budget due to labor costs. Remember, some tasks like water issues might need a professional regardless of your skills or desires.
Saving Strategies
There are ways to manage costs effectively:
-
Compare quotes from different professionals.
-
Look for sales or discounts on fixtures.
-
Consider doing some work yourself if you’re capable.
Balancing between DIY efforts and professional help can optimize savings without compromising quality or legality.
Final Remarks
Navigating the waters of tiny home living can seem like a daunting voyage, but with the right knowledge about plumbing mechanics, water tanks, and eco-friendly practices under your belt, you’re well-equipped to make a splash. You’ve learned how to select the perfect water tank, tackle DIY plumbing, connect your home to water sources, and even navigate the legalities—all while keeping your footprint light and your budget in check. It’s about crafting a space that’s not just a house but a sustainable sanctuary that reflects your values and lifestyle, incorporating water conservation measures.
Now, dive in! Take these tips and tailor them to fit your tiny home dreams. Whether you’re hooking up on-grid or setting sail off-grid, remember that every drop of water counts in making your tiny abode both functional and environmentally friendly. So, grab your tools and let’s make those tiny house water solutions a reality. Your adventure in compact living awaits!